Ashes of LVO - 2019
LVO 2019 has come and gone. Let’s sift through the rubble and do a bit of reflection on what happened.
What Could Have Been
Let’s get this out of the way quickly - LVO was a rough event for me. I walked away with just 2 wins with only one of them completely out of reach. Despite this, there’s still quite a bit that can be taken away from it.
If you missed it, here’s what I took to LVO this year.
Here’s what I drew:
- Death Korps of Krieg
- Thousand Sons
- Cadians + Castellan
- Orks
- Orks
- Genestealers
On paper, none of these were stellar matchups. You might say with all those butcher cannons I have, I’d be sitting pretty against those hordes. But one thing for certain is that those hordes had a ton of mobility.
Let’s break down how the matches went.
Round 1 - Death Korps of Krieg (Jason Hickle)
Jason’s List
Battalion - Death Korps of Krieg
- 2x Marshals
Primaris Psyker
- 2x Astropaths
10x Engineers
- 5x Grenadier Squad
- 5x Grenadier Squad
- 5x Grenadier Squad
10x Infantry
- 2x Storm Chimeras
- 3x Centaurs
Supreme Command - Custodes
- 2x Shield Captains on Bikes
- Shield Captain Terminator
Super Heavy-Aux - Imperial knights
- 3x Armiger Helverins
Deployment
Map: Hammer and Anvil
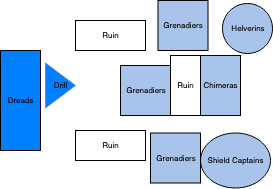
Not all units depicted on map
Jason smartly deployed his Helverins to the back corner, taking advantage of his 48” reach on his Autocannons over my 36” Butcher Cannons. The Shield Captains sat to the flank, screened by Grenadiers. In reserve was his Terminator Captain.
I started the Cultists, Tzaangors, Dreads, and the Drill (packed with Rubric Marines, Ahriman, and the Sorcerer) all on the board. In reserve were my Obliterators and Slaanesh Sorcerer.
Turn 1
Both of us decided to try and seize control of the middle of the board. I sent the drill forward and assaulted his two Shield Captains along with the Dreads that slowly marched up the center. Meanwhile I held my Cultists out of line of sight on objectives while my Tzaangors started to sneak up the top side of the board. I think I did a great job of using LOS blocking terrain to move up the board.
By the end of Turn 1, he had a single shield captain left with 1 wound, which he retreated from combat with. This shows you how good the Termite drills are when used against the right targets. Otherwise, there were a couple volleys of fire from the butcher cannons and missiles. I used the missiles on the Deredeos to widdle down his infantry camping the back objective - this prevented him from using them on forward objectives and make board control a bit easier for me.
Turn 2
Jason continued to press his advantage with the Grenadiers, even getting on to explode dead center of my Dreadnoughts, doing a good deal of wounds to everything. Despite that, I was able to buy a turn out of LOS from the Helverins by sitting behind the bottom ruin with the Dreads and cleaning up his units that had advanced up. Meanwhile, to the top of the board, my Tzaangors made their charge on his remaining Grenadier squad and surrounded it to lock it in combat.
The Drill didn’t make it beyond Jason’s shooting phase and was eliminated after taking a bit of damage from it’s combat with the Shield Captains. This was where I made my crucial mistake of the game by completely forgetting that the Rubric Marines were inside. While Ahriman and the other Sorcerer did work from just wound where the drills were, I was able to pop the Chimeras and begin to start taking shots at the Helverins, getting one nearly destroyed.
Turn 3
Jason’s luck really went to crap on this turn. His Primaris Psyker peril’d, killing himself due to being low on wounds from an attack from Ahriman/Sorcerer. This then eliminated the Astropath that was standing just inches away from it. This really hurt because it shut down his ability to deny even a few of my powers, leaving Ahriman and the Sorcerer to wreak havoc.
My Obliterators came down this turn, just barely able to get in range of one of the Helverins and it was gone. Despite his attempt to flank me with his Terminator Captain, Ahriman and my Dreads were able to turn around and deal with the intruder in our back line.
Turns 4-6
We played out the remaining turns rather quickly, as by then the game has soundly turned in my Favor. With no long-range support to counter the Dreads, they pretty much took up shop in the middle and the game was over.
Jason really knew his army well and played the mission great. Unfortunately, the -1 to hit was a bit much for his army to overcome, knocking the Helverins just off their efficiency tier while the Drill’s ability to knock out the Shield Captains early really put him on his back foot.
Result: 30-19 WIN
Round 2 - Thousand Sons (Zack “Big Red” Thacker)
Zack’s List
Battalion - Nurgle
2x Poxbringers
3x Nurglings
2x Fould Blightspawn
2x Plagueburst Crawlers
Supreme Command - Thousand Sons
- Ahriman
- 3x Daemon Princes with Wings
Battalion - Thousand Sons
3x Sorcerers in Terminator Armor
3x 10 Cultists
Deployment
Map: Pointy Hammer and Anvil
Zack deployed his nurglings up front behind ruins in the middle where I couldn’t see them. He then simply positioned the rest of his field behind them. I elected to deploy my Dreads back from his ability to Assault them, putting my Cultists and Tzaangors up front as screens. Obliterators, the Drill, and the Sorcerer were all in reserve.
Turns 1-6
I’d love to break down all of the movement and positioning work that Zack and I did this game, trying to get things in range, clear screens, and shoot characters but both of us knew what we were trying to do and in the end, the GHL’s on the Deredeos were not enough to take care of the nurglings. This meant Zack was free to smite his way through my army.
Of all the games I played over the weekend, this is the one that really pushed me hard. Hats off to Zack on an awesome game.
Result: 23-16 LOSS
Round 3 - Cadians with Castellan (Adam Green)
Adam’s List
Vigilis Defiant Emperor’s Fist Tank Company - Cadians
- Pask
2x Tank Commanders with Battle Cannons
3x 10 Guardsman
Platoon Commander
- 3x Mortar Teams
Battalion - Cadians
- Tank Commander with Battle Cannon
- Primaris Psyker
Company Commander
3x 10 Guardsman
- 10x Crusaders
- Ministorum Priest
Super Heavy-Aux - Imperial Knights (House Raven)
- Castellan, 2x Shieldbreakers, 2x Siegebreakers
Deployment
Map: Dawn of War
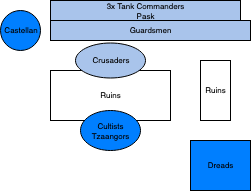
Not all units depicted on map
I knew going into this game it was going to be tough. Cadian’s have lots of good tools to deal with Chaos, which meant I needed to play a bit coy with Line of Sight. I was able to deploy first which meant he was able to position his Castellan away from my Dreads, as I’ve shown on the map. Meanwhile my Obliterators and Sorcerer went into reserve along with the Drill containing the Rubrics, Ahriman, and my Sorcerer.
I had played Castellans before and was confident that the approach that had worked for me in the past would work for me in this game. I could take the Castellan with my Drill & Obliterators and let the Dreads go toe-toe with the Tank Commanders. Meanwhile, I just needed my Cultists and Tzaangors to hold off his Crusaders which were headed up the middle.
Turn 1
I focused on using my Deredeo missiles to hammer down his mortars. They are incredibly good against Tzaangors and Cultists so, the last thing I needed was him being able to board control me. While my Dreads marched up the right side of the board, hiding behind a tall hill, they focused on some of the Guardsman that were in range. This put me in a good spot to score “Kill More” while I could see him controlling “Hold More” for the early part of the game.
Adam swung his Crusaders into my cultists and they were gone fast, leaving 2 squads and Tzaangors hiding in cover behind them. The Castellan failed to do too much to the dreads, thankfully due to some good work with the LOS blocking terrain.
Turn 2
This is where I planned to make my big move. I dropped everything from reserve to the left of the Castellan on the map above. Everyone hopped out and away we went. I focused on using Deathhex on the Knight and Prescience on the Obliterators. Both worked. Next, I just needed to shoot my Obliterators into the Knight and…
I proceeded to roll 1, 1, 1 for their stats. Terrible. Trying to salvage this a bit, I thought “I’ll just re-roll the damage roll and…” another 1. Adam and I had a good laugh about that and we proceeded to move on with the game. No, the Obliterators did absolutely nothing to it.
I was able to charge the Drill into the knight and then pretty much wiffed. I planned on bringing the Sorcerer in as well, who had taken the Murder Sword on the knight just to commit to my strategy of eliminating the Castellan from the game. He failed his charge.
Turn 3
After my failure of a turn 2, this left me exposed and Adam was able to clean up the Drill and start eliminating everything I had brought down from reserve. The Obliterators were quickly gone, the Sorcerer, as well as the Rubric Marines. I responded with DMC on my Sorcerer moving him back to behind the Cultists and Tzaangors to try and help their losing battle.
My Dreadnoughts were also finally pushing up and into range of the tanks, having spent the past couple turns shooting guardsmen. The result was I was able to eliminate one of the Tank Commanders and plenty of Guardsman.
But Adam’s knight was still standing and with just a few wounds left, it was wreaking havoc on me, popping a couple Dreads with ease.
Turns 4-6
The rest of the game for Adam was cleanup time. My Dreads were so far out of position when the Drill / Marines failed that my forces essentially sat there shooting a losing battle for the remainder of the game.
Result: 31-22 LOSS
Round 4 - Orks (Andy Scott)
Andy’s List
Battalion - Evil Sunz
- Warboss
Warboss in Mega Armour
3x 30 Boyz
- 2x Mek Gunz
Battalion - Bad Moonz
2x Weirdboys
- 20 Gretchin
- 16 Gretchin
10 Gretchin
- 15 Lootas
Outrider - Deathskulls
Big Mek on Warbike
3x Shokkjump Dragstas
Deployent
Map: Pointy Dawn of War
Andy deployed as you would typically see an Ork army deploy - lots of Boys out front, a layer of Gretchin, Lootas in the back. I was concerned about those Lootas, as they had the power to really take it to the Dreads with sheer weight of fire. In practice games, I had a hard time dealing with them and knew right away my key to winning was to pop the lootas.
So, I deployed my Dreads outside 36” from the Lootas but inside 48” so I could hit them with the Deredeo Missiles. I was prepared to use the Drill, Rubric Marines, Cultists, and Tzaangors as Screens.
Turn 1
Andy was on me fast turn one. Obviously using Da Jump to push his boys up the map quickly, he swarmed the few Cultists I had sitting out on an objective and easily took control of it. I started working my Dreads up the left side of the battle field which his Dragsta’s were occupying.
While I popped a couple shots at the Lootas, my goal was to get Andy to spend some CP on the shield - which he did. I then spent time shooting the Grots to work on opening a hole for my Obliterators to work with.
Turn 2
This is where Andy put me on my back feet. With one squad of Boyz already up the board holding an objective on my side of the table, he got his second squad of boys up the table and in my face. Thankfully I had a squad of Cultists that he needed to go through first to make any kind dent. While he did pull this off, ultimately my Rubric Marines and Ahriman were unharmed and simply stepped back out of the consolidate on my turn.
Ahriman and my Aspiring Sorcerers were then able to use Infernal Gaze, Tzeentch’s Firestorm, and Doombolt to eliminate his Big Mek. This was crucial because now he didn’t have an invulnerable save and my Butcher cannons went to work getting the squad way down in size. I didn’t want to risk him keeping them alive so I committed to completely killing the unit, which I did.
It was this turn that I responded with my Obliterators. Using the missiles from the Deredeos I had cleared the line of Grots screening his Lootas and let my Obliterators just go to work wiping them out. It took one round of shooting and that was that.
Turn 3
Now the battle had gotten really good. His third and final squad of Boyz was now in my face, while his other was still holding the objective far enough away to not be an issue. I now controlled the other side of the table and his characters mostly weirdboys, were forced to move up field. With a few shots I was able to wipe away some more Grots and now his Warboss was exposed to my Obliterators, which cleaned him up pretty quick.
It was at this point that my Aspiring Sorcerers decided to go nuclear and blew themselves up. I went ahead and used Soul Flare at the same time to try and take down some boys with me. I got 2. Meanwhile, I rolled 3’s on my Rubric Squads. Not good, but we sure got a good laugh out of it.
Turns 4-6
The game wound down quickly as once my Dreads were unopposed they pretty much walked the table cleaning up his remaining units. Turn 6 I was able to table his last units for a huge win.
Result: 36-25 WIN
Round 5 - Orks (Aurelio Correa)
Aurelio’s List
Battalion - Evil Sunz
- Warboss in Mega Armour
Weird Boy
- 2x 30 Boyz
20 Boyz
- 8x Meganobz
Battalion, Vigilis Dread Waaaaagh - Bad Moonz
- 2x Big Meks
Warboss
3x 10 Gretchin
- 15 Lootas
- 7 Lootas
Battalion - Mixed Orks
2x Weirdboys
3x 10 Gretchin
Deployent
Map: Hammer and Anvil
You can imagine getting to the table after just having won a big match vs Orks and realizing you were about to go into the same fight. But this just shows how different the armies are that you face in a tournament this big. Aurelio’s list was a lot trickier to unpack but the MSU-style Gretchin were a clever idea on his part, making it easier to deal with morale and protect his Lootas.
Deployment saw both of us make use of LOS blocking terrain to hide our assets. For him it was his Lootas and for me it was the Dreads.
Turn 1
He gave me first turn and I immediately sought to use the terrain to my advantage while I worked on cutting a hole in the Gretchin to the Lootas. Essentially I embarked on a similar strategy of taking out the Lootas to control the board.
Aurelio has other plans and made a great move by cutting off my backfield with his Boyz using Da Jump and eliminating my Cultists/Screens on the objectives. This meant my Dreads were now exposed and vulnerable.
Turn 2-6
I did my best this turn to continue to my strategy of going after the Lootas. I had been able to do so, and with the Drill, Rubrics and Obliterators, his Lootas were rendered ineffective by the end of my shooting phase. I then assaulted with the drill to put increased pressure on the leadership of his army - Weirdboys and Bosses.
Meanwhile, he made the game-deciding move locking up all of my Dreads in combat and they were essentially rendered useless from there on. What I then did was spent turns 3-6 trying to get out of combat and rescue my Dreads. I had no way to hold objectives and he had nearly 90 Boyz just running all over the place on me.
It was a tough pill to swallow but I had been out maneuvered on that one.
Result: 33-26 LOSS
Round 6 - Genestealer Cults (Bradley Nichols)
Bradley’s List
Battalion - Kraken
- Malanthrope
Swarmlord
3x 20 Genestealers Scything Talons
6 Hiveguard
- 3x Tyrant Guard
Battalion - Tyranids
2x Broodlord
- 3 Rippers
- 2x 27 Termagants
Deployment
Map: Dawn of War
After coming out the last game getting swarmed, it was about to be another tough matchup for me but when we rolled Dawn of War for the map, I knew the game was pretty much in Bradley’s pocket, barring some huge mistake.
Turn 1
Bradley went right through all my screens and straight to the Dreads. They never fired a single volley through the course of the game.
It was then the same game I had just played, my Dreads locked in combat with no where to go and no way to get out.
Result: 26-16 LOSS
Takeaways
Overall I thought I scared pretty well, even in my losses. There were some key design decisions I made with the army leading up to LVO that looking back I would probably make different. Those will get factored into my army for the 2019 season.
While I’ll be talking about these in more depth on the next Tizcan Podcast, I can summarize by saying:
- Contemptors are awesome, but I would only take them as Alpha Legion for now
- Drills are awesome. Take as many as you can
- Targeting characters with Psychic powers works really well for Thousand Sons - who needs snipers??
- Deredeos are probably no worth the points you pay for them
I’ll be back with more posts leading up to the first GT coming up in March.